|
A Guide to Setting up a Half Life Dedicated Server
Disclaimer**Under no circumstance may the following information posted by me (ps2cho) be copied onto any site or other medium without my personal consultation and approval.**
Ok after noticing and having some people emailing me about how to setup their own HLDS Server I have decided to make an in-depth tutorial on how to figure out if you can even do it, what hardware you need and also how to setup HLDS, AMX, AMXX, How to restart the server and possibly a few other addons.
Quick Links
HLDS For Windows
Tweaking Your Server
HLDS For Linux and Counter-Strike Source HLDS
First of all let’s start with some vocabulary:
HLDS (Half Life Dedicated Server)
RCON (The Basic Command Variables
CMD (The DOS command prompt)
LAN (Local Area Network)
WAN (Wide Area Network -> the internet)
WLAN (Wireless Local Area Network)
CD (Change Directory)
CVAR (Game settings that define how the game reacts to everything you do. EG. Gravity
CFG (Config File)
AMX (Another versatile Half-Life metamod plugin which allows you to elaborate on your abilities in the server beyond RCON)
AMXX (AMX Mod X is a versatile Half-Life metamod plugin which is targeted toward server administration)
AdminMod (Although this is another choice for administration, I do not recommend it over AMXX unless your computer is very slow.
As I continue this thread, I will add more as I come across it.
Hardware and Connection
Ok so step one is of course can I EVEN run a server? What are the requirements?
I have always suggested to people that you require about 20MB of RAM for each slot on the server. Many people out there suggest only 8MB per slot but I personally believe that this is not sufficient because when the server is packed to the full slot capacity, the entire Physical memory of the system is used up. Ever try to do remote desktop to a computer who has a packed server? It takes quite some time! And the people on the server spike up to about 600ping while you’re trying which OBVIOUSLY shows that the computer is struggling to keep up otherwise the pings would not spike up to 600 would they now?
So, my personal suggestions would be:
08Player Server = 160MB RAM
10Player Server = 200MB RAM
12Player Server = 240MB RAM
16Player Server = 320MB RAM
18Player Server = 360MB RAM
24Player Server = 480MB RAM
28Player Server = 560MB RAM
32Player Server = 640MB RAM
So you have determined the correct amount of RAM you need for the server.
For the processing power…it is not AS limiting. I suggest anything over a 600MHz, Pentium or AMD. The Processor, although used a lot when full packed, is less intensive towards the HLDS because the RAM does most of the work. What you WILL find although is that if you decide to add bots to the server, you will experience some choppy’ ness in the server because now it has to process your commands, and control bots at the same time. I have found on my server that after about 15bots, my server will start becoming choppy, and I have a Duron900 @ 1.14GHz with 384MB RAM.
Now to the Hard Drive. For a minimum, I suggest 700MB.
The initial HLDS can range from 550MB to 700MB depending on the Mod you wish to use the server for. For a Condition Zero Server, the very basic package for the server to run uses 628MB of your Hard Drive. If you are planning to get an array of maps and plugins, I suggest having at least 1.5GB of Hard Drive space free. Creating a partition for the server on the hard drive is also my recommendation because it will speed up load times because it has nothing else to search through.
Now, the most important aspect of building a server is the connection.
Your connection will impact every player over WAN. Of course, anybody who is playing over LAN will only be impacted by the power of the computer, not the connection. Whoever is playing over WAN, they are affected by both the computer, and most importantly, the connection that you are hosted by. HLDS use your upload bandwidth. Although it uses your down bandwidth, it uses VERY little at all and it will not be your problem. Your upload speed dramatically affects what type of pings you will be expecting on the server.
For an example, Server 1 has 256k upload speed and is located in LA. N00b Play3r 1 Plays on this server from Las Vegas and pings about 90. Server 2 is also located in LA. N00b Play3r gets bored of server 1 because of the rather high ping and moves to Server 2. Server 2 has 1MB upload, N00b Play3r 1 now pings 35.
So your possibly asking how to I find out my bandwidth? Well first of all, our bandwidth, which is supplied by our ISP has the official given bandwidth and then there is the physical or throughput bandwidth. The throughput is usually lower than what is official titled. Eg. My 512k upload bandwidth runs at about 490-505kbps, that is the throughput.
To find out your bandwidth, make sure nobody is downloading or uploading anything on your network and go to this website:
www.dslreports.com/stest
On a side note: You MUST have Java installed to run this.
Scroll down a little and you will see a few companies Like SpeakEasy, MegaPath networks etc. Now next to each of these has text that has “Test speed using our server at xxxxx, county, state.” Now just click on it and you will redirected to the next page where if you scroll down a little again you will see a java box that has a START button. Just press it and it will test your connection. At the end you will be redirected to the results page which will look like this:
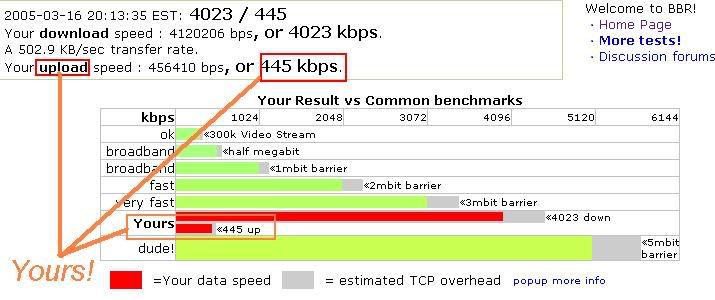
Your Upload bandwidth will be located like I have pointed out.
So in conclusion, my suggestions of the ideal basic system would be the following:
• 512k upload bandwidth, at least 450k real-time, to be in combination with the following systems.
• 10Player Server -> 600MHz CPU with at least 200MB RAM
• 16Player Server -> 1GHz CPU with at least 320MB RAM
• 32Player Server -> 2.5GHz CPU with at least 640MB RAM
To understand how many players your connection can hold, enter any server, and go into console ~ and enable net_graph 3. You will see that most servers are sending you ~7-10k/s (The in bandwidth) So therefore, you should be designating around 20 per player because you are not connected a major backbone like most Dedicated Game Server Providers.
So that is the requirements section complete. You now have established what system to get, what internet connection will work the best and your ready to go!
Installation of HLDS
Ok so you have your 1GB of HDD space ready, your computers ready to go!
First of all you will need to head over to http://www.steampowered.com/?area=getsteamnow and download the “Windows HLDS Update Tool” Located to the right hand side of the page.
Just save the file to your desktop for now as its not needed after we install.
Go to your desktop and run the installation file. Press next and accept the license.
Now you should be at this screen:
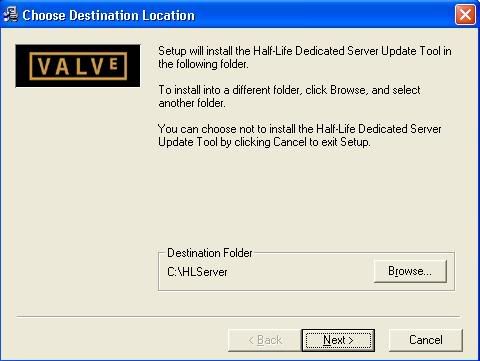
For now I suggest that you use the default directory (If you created a separate partition, then of course choose the partition but leave the folder as it is)
Now hit next and it will install.
Now when you hit the region screen you are probably wondering why I have to choose where I live. This is because when people set filters for the location of servers, your server will not show up where you would want it to show up because this was not set up correctly. It should look like this:
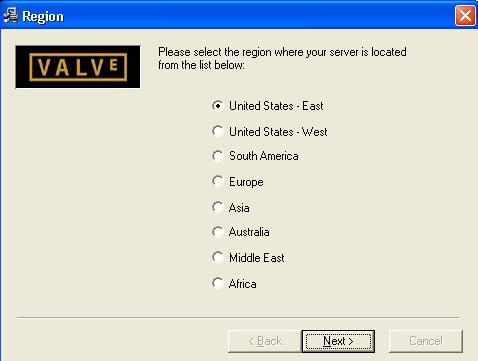
Pick your location and hit next, next, don’t bother with viewing the readme because I am going to tell you everything important.
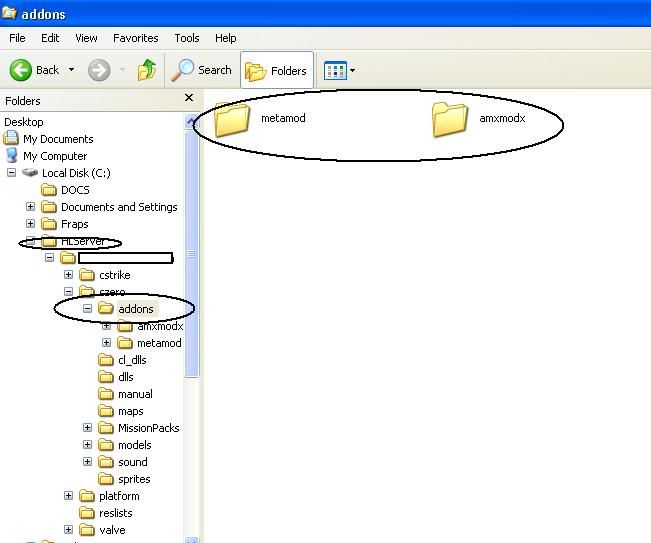
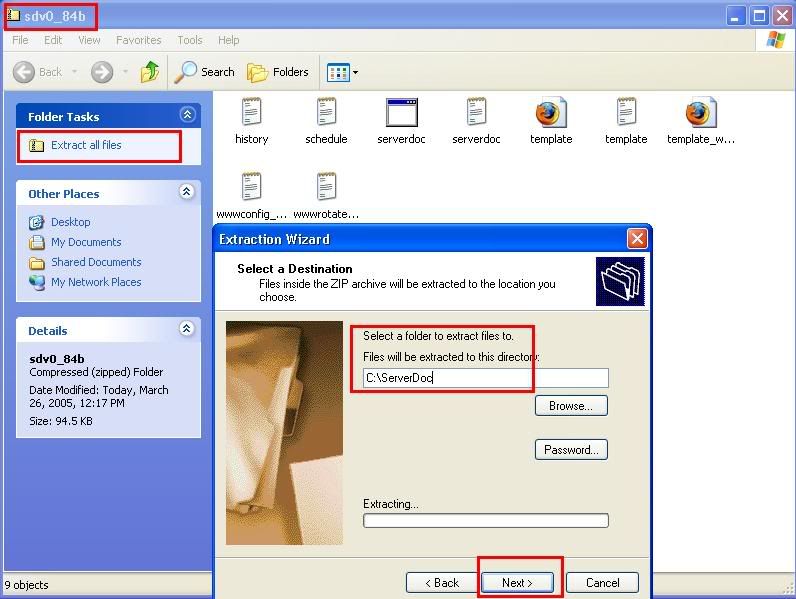
Now open the folder where you have installed the program to double check its directory and its contents like this:
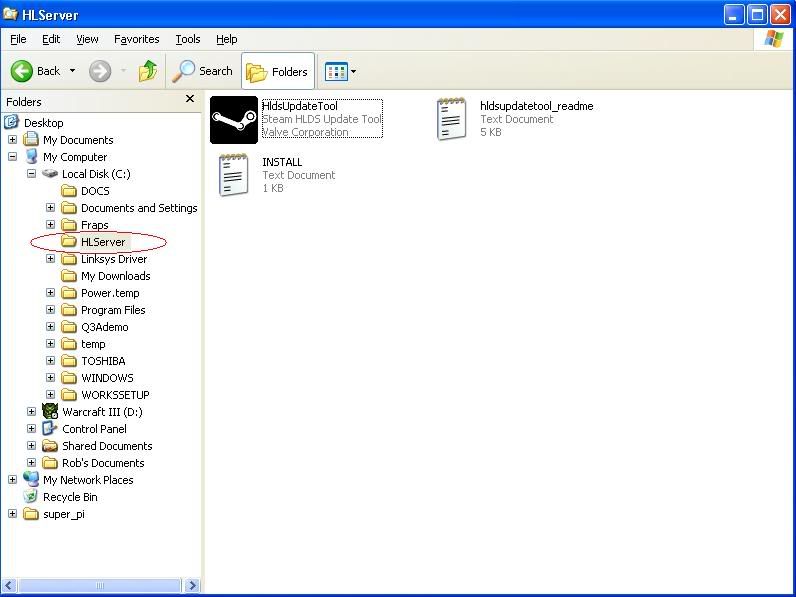
If you see those files in there then you did everything right. Now comes the tricky part in which most people give up because the readme is so hard to comprehend. I’m going to put it simple for you : )
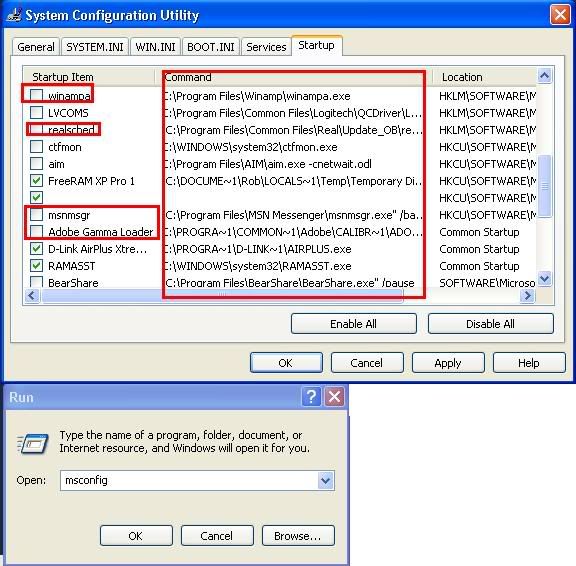
Go to Start->Run and a window will come up. With that up type in the box the following like this:

Now that you have the command prompt up, type the following shown in the next picture:
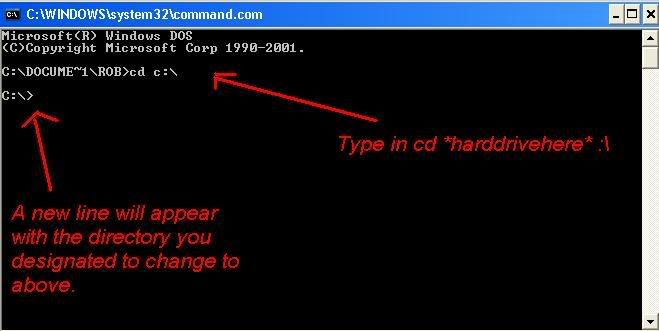
Now type in cd c:\hlserver
Now the box should say C:\HLSERVER>
Now ASSUMING you DO have a steam account, You will now update your game using the following command:
C:\HLSERVER\Hldsupdatetool –update GAMEHERE ACCOUNTHERE PASSWORDHERE Y
If you do not own a steam account you can create a free one here:
Just type:
hldsupdatetool -command create -username usernamehere -email youremail@isp.com -passwordhere -question "yourhintquestion" -answer “youranswer”
:-:The games that you can update are the following:-:
Czero : Condition Zero
Cstrike : Counter Strike 1.6
Counter-Strike Source : CS Source
DMC : Deathmatch Classic
DOD : Day Of Defeat
TFC : Team Fortress Classic
TS : The Specialists
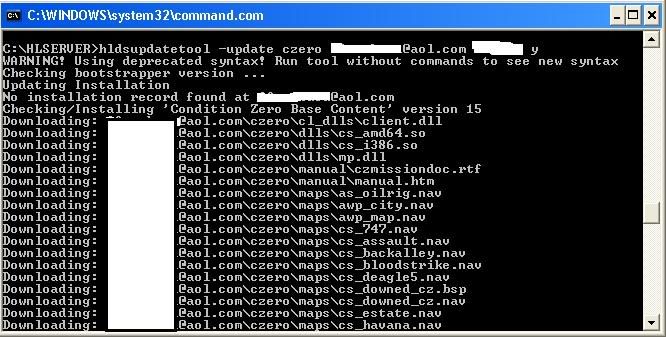
Once all the needed files have been downloaded, It will say:
HLDS installation is up to date
Now you will notice in your HLServer folder that now a new folder will have been created with its name as your account you downloaded from.
Your HLDS is now ready for action! Let’s give it a try, but first we gotta set it up the correct way which uses the least amount of resources, and is the best way to keep it.
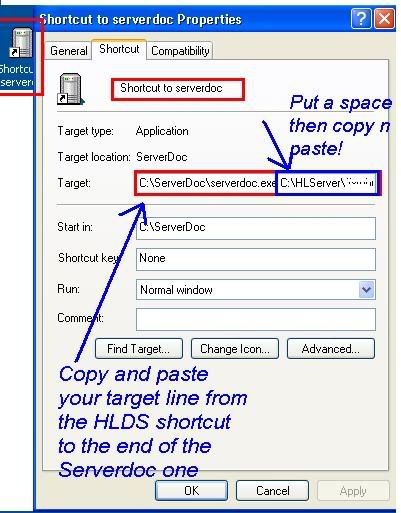
Create a shortcut to the HLDS to your desktop or wherever you wish to start the server like the following:
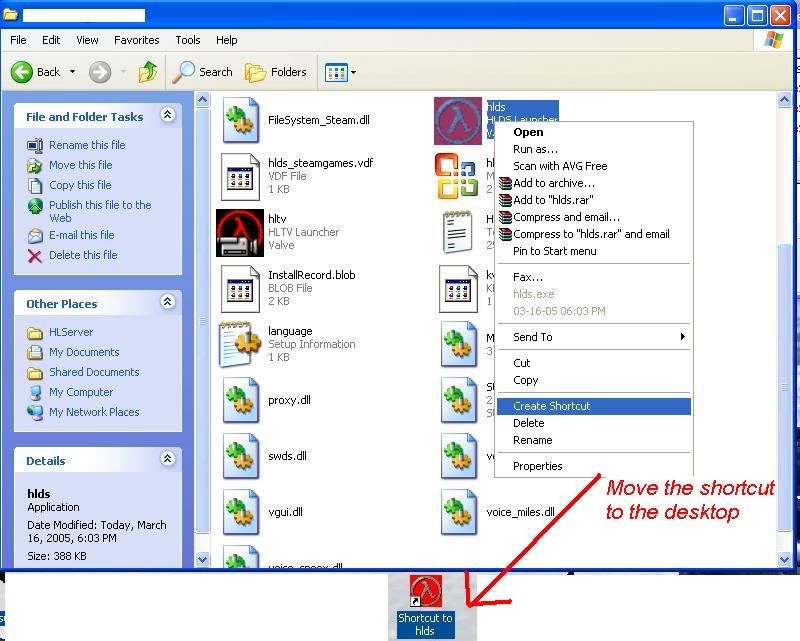
Now that you have a shortcut on the desktop we can define what our server will start up as.
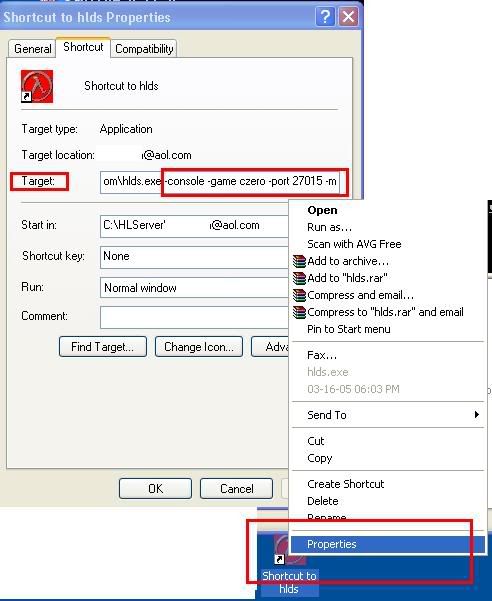
Now right click on the shortcut and go to properties and in the TARGET box put the following:
"C:\HLServer\youraccount\hlds.exe" +maxplayers 10 -game czero -console +port 27015 +map de_dust2_cz
The Maxplayers = the Amount of slots, so maxplayers 10 = 10 player server
The Port will be 27015 because that’s the most default port so leave it as it is.
And the map…up to you, I choose de_dust2_cz because its my favorite : )
A picture of this is below:
Ok, Now just double click on the Shortcut to HLDS icon on your desktop and let it fire up! If everything went correctly, it should look like this:
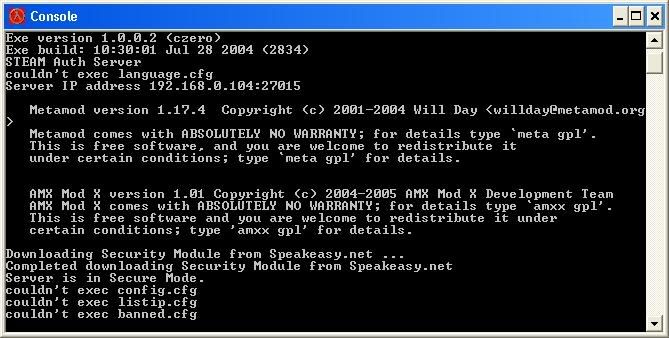
You have just successfully created your very first HLDS =).
Configuring Your New Server
Now we will setup how the server will do certain things. This is called the config.cfg file. The config.cfg file ultimately decides the startup settings of that the server will uphold like how long rounds will last, how many rounds will be the maximum, how long freezetime is etc.
Head over to your HLSERVER Folder then go into > your account > your Mod folder.
You will find yourself a config.cfg file in their but we will ignore that because im going to teach you how to create cfg files that we will use the same format in the future.
Open Notepad as this is the easiest program to create these.
Now lets start off with a little introduction to the server.cfg. When creating cfg files, //// before any text means that the server will not read this line so lets add at the top the following:
Note: 0 = off and 1 = on -> On most of the settings.
///Basic Server CFG file. Execute to return to original settings -> rcon exec config.cfg
Now we need to add some very important settings to maintain your server:
///Remember the IP addresses of the banned players.
exec listip.cfg
///Keep your banned players…Banned.
exec banned.cfg
///The main password to the server, if this password is discovered, your server is at risk.
Rcon_password yourpasswordherechoosewisely!
///Name of the server
Hostname “Overclockers CZ Server I Just Created”
///Allows the players to pause the server.
pausable 0
///Flashlight on
mp_flashlight 1
///Allows you to use all available views when dead.
mp_forcecamera 0
///Allows you to select different people playing to watch when dead.
mp_forcechasecam 0
///The amount of time available where everybody cannot move at the start of
every round in seconds.
mp_freezetime 1
///Once somebody kills too many people, or kills hostages etc. The server will kick him
mp_autokick 0
///Allows you to attack your teammates
mp_friendlyfire 0
///The timelimit on the map before it changes
mp_timelimit 25
///Maximum numbers of rounds within the timelimit, when reached the server
will change the map
mp_maxrounds 0
///Select the maximum number of players to join the game.
mp_maxplayers xx
///Allows everybody on the server to hear you
sv_alltalk 1
///Does not allow the in-game cheats to be used
sv_cheats 0
/// Removes/Sets any password to the server. With “” Empty, it means remove any password
sv_password ""
///This codec uses up less bandwidth on the server when everybody speaks, so use it.
sv_voicecodec voice_speex
///Set the quality of the voice, 1 is hard to hear, 5 is very good quality but bandwidth consuming. 2 is default and is sufficient.
sv_voicequality 2
Ok that’s about it! You can just copy and paste these items into your newly created notepad page and edit them to your preference.
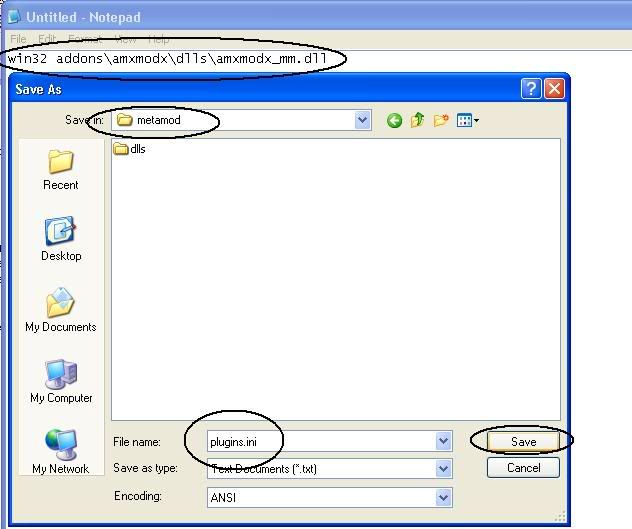
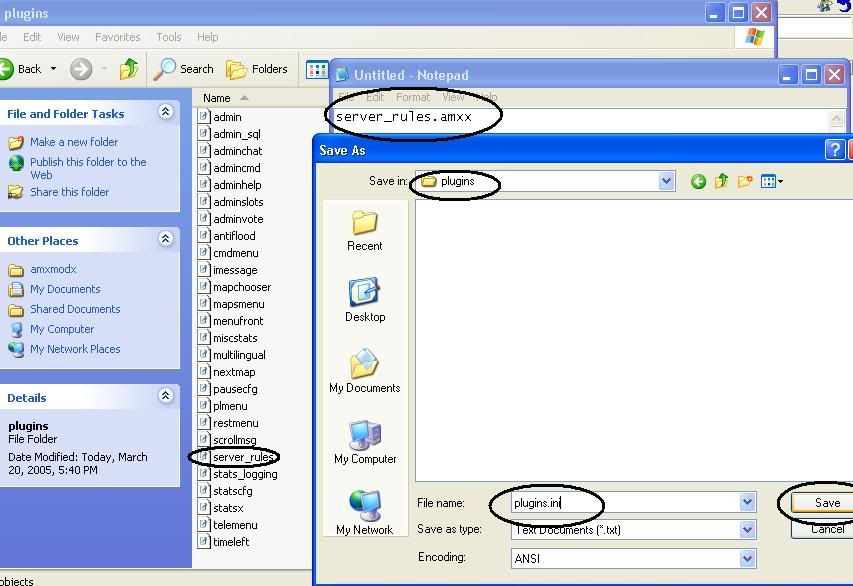
Now with your newly created page go to File->Save As-> Locate your Mod Directory and type in server.cfg and save it like the following picture:
Click below to view image due to restrictions.
http://img.photobucket.com/albums/v2.../savingcfg.jpg
You have now set all of your server’s settings. I would recommend from here to head into your server and connect to it.
To connect to your server you can either do it through your network by typing in connect “YourServersLANIPhere:27015” e.g. Connect 192.168.0.103:27015 in the console of your game.
Your server may or may not show up in the games list…we have yet to open ports and I will tell you how to do this in the troubleshooting section.
Now that you’re server.cfg file is complete your server is pretty much ready to go. We have a few last items that you can change to make your server perfect.
You have the mapcycle and motd text files. The Mapcycle is as it sounds. This will have maps in that the server will change to at the end of each timelimit. Just define what maps you want to be included in your server.
Eg.
De_dust2_cz
Fy_Iceworld_cz
Cs_assault
In order and downwards.
Next is the motd file. The motd file stands for Message of the Day. This is the first box that comes up when you enter any server. You can put rules here, a picture, whatever you want.
I created a rules picture in mine and the motd uses html as the coding.
To have a picture as a background use this code:
<body background="yoururlhere.imgextension">
To just have text with rules you can do the following:
(the B, I and U stand for Bold, Italic and underlined.)
<center><b><i><u>Welcome to *serverhere* Please review the rules before entering:</center></b></i></u>
<br>
<br>
No Teamkilling
<br>
Behave
<br>
Etc…
Now just save the files. You do not need to make these .cfg files! They are just plain text files.
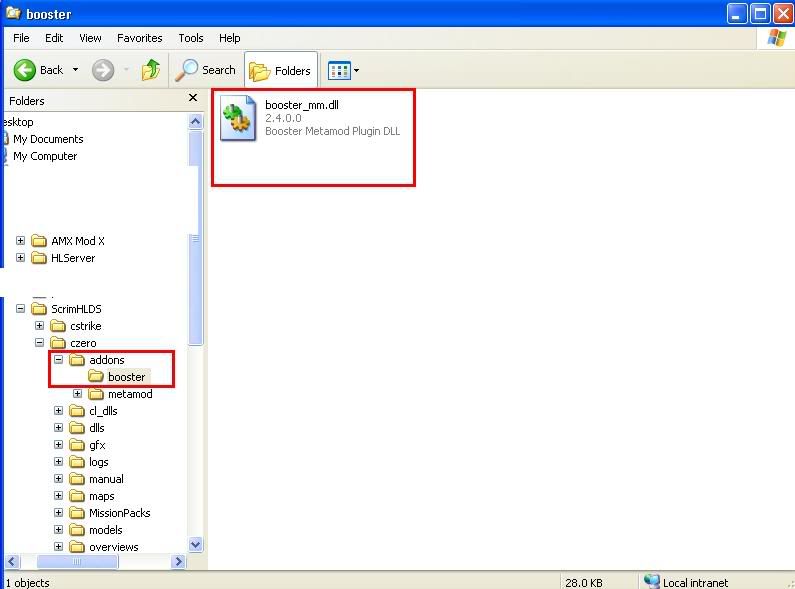
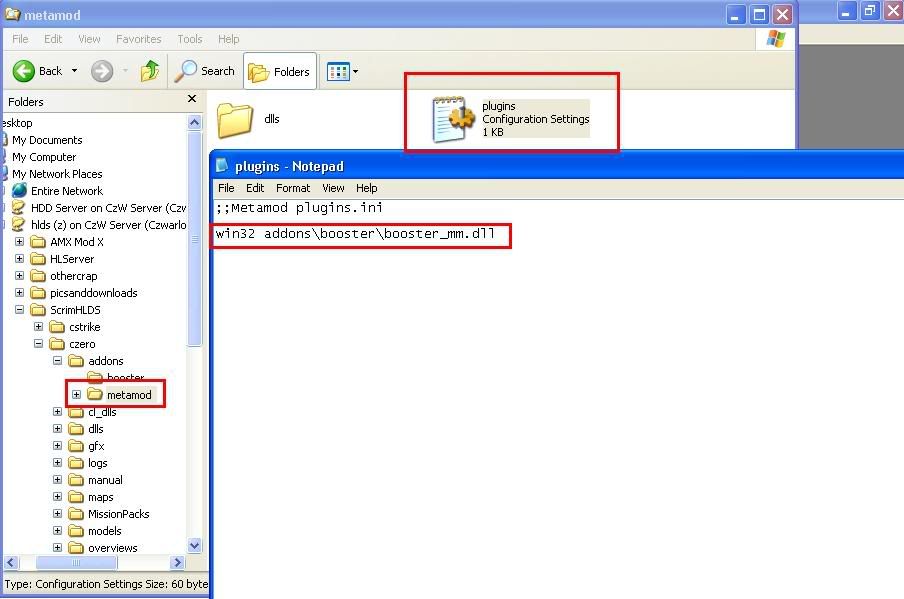
This ends the HLDS Installation. Next Up will be how to install the addons, how to tweak them, add cool effects, plugins, tweaking your system for performance and troubleshooting! This will come very soon! |
 关注公众号
关注公众号

 Easy.
Easy.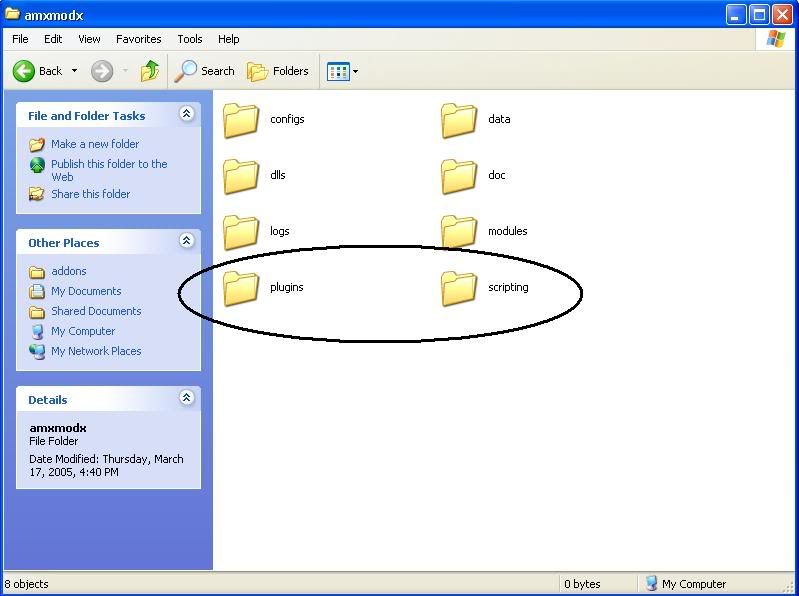


 So I will spend a little more time and add all the images again so you can see exactly how to do it.