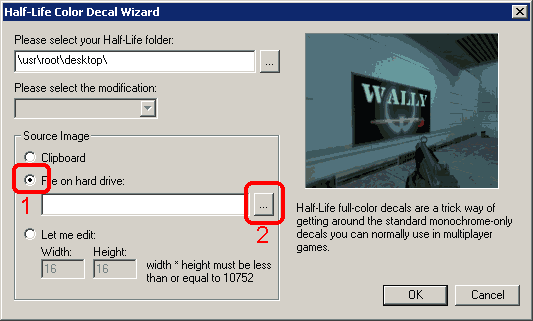
找回密码
 注-册

QQ登录

只需一步,快速开始

查看: 1415|回复: 0

Custom Spray

[复制链接]
Leya 发表于 2008-4-27 14:26:46 | 显示全部楼层 |阅读模式
Custom Spray
These days, custom spray are very common on most of the Half-Life mods! Wheter you want to say "PWNED!!!" or "Shoutout to HLDS 101", sprays allow you to express emotions and messages.

The only problem is... How on earth do you create custom sprays??!?!?!

And the answer is (surprisingly) on this page! Here are the steps on creating your custom spray:

  • Choose a resolution
    All Half-Life sprays must respect a resolution. In Half-Life, your spray's resolution must be dividable by 16 and the total pixel count must not exceed 10752 pixels. Here is a little table of common resolutions that you can use if you don't want to do the math:

    NormalWideSquare
  • Create your spray
    By using your favorite photo editing sotware, create your spray. Make sure that the resolution you use is subject to the guidelines and that you use 16-bit color. After editing, save your file as a 16-bit bitmap (BMP).
  • Install and use Wally
    For creating the actual spray file, we need to use an application called Wally! You first have to download Wally.
    Click here to download Wally directly from GSTutor.

    When Wally is installed, open it. Go to the Wizard menu and select the HL Color Decal option:


    When the wizard appears, select the File on HardDrive radio option and click the browse button to browse for your BMP file that you created earlier. You can ignore the "Half-Life" folder option:


    Click the OK button.
  • Save the WAD file
    When you click OK on the wizard, the following window will appear:


    You now only have to save this WAD file! Go ahead and go to the File menu and click Save As:


    On the save dialog, select a folder in which you would like to save the file in (your Desktop is fine). Do not save it into your game folder right away, we want to save it somewhere else first so that we would have a backup if something happens.
  • Copy the file into your game folder
    Now that you've saved the pldecal.wad file into some temporary folder, we need to place it into the game folder so that it works. For this, we need to know where to place it. In short, here's where you place it:
    C:\Program Files\Valve\Steam\SteamApps\account_name\game_name\game's_short_name\

    In addition to that, you need to create a second file called tempdecal.wad to create it, simply copy and paste your pldecal.wad file and rename the new one to tempdecal.wad.

    Here's a brief table where the file must be located for most popular mods. Be sure to replace the drive letter by your own's and the account_name by your account's name:
    ModFolder
    Counter-StrikeC:\Program Files\Valve\Steam\SteamApps\account_name\counter-strike\cstrike\
    Condition-ZeroC:\Program Files\Valve\Steam\SteamApps\account_name\condition zero\czero\
    Day of DefeatC:\Program Files\Valve\Steam\SteamApps\account_name\day of defeat\dod\
    Team Fortress ClassicC:\Program Files\Valve\Steam\SteamApps\account_name\team fortress classic\tfc\
    Half-LifeC:\Program Files\Valve\Steam\SteamApps\account_name\half-life\valve\
  • "Lock" the files
    Originally, when you would go to the options menu and change something, your spray will reset to the default one. To prevent this from happening, you need to assign Read-Only options to your two spray files.

    o Select the spray files and right-click on them.
    o In the popup menu, choose the Properties item
    o In the properties window, check the box that's next to Read-Only
    o Click OK
  • Enjoy your new spray!
    You've finnaly made it. Go to a server and test out your spray.
回复

使用道具 举报

您需要登录后才可以回帖 登录 | 注-册

本版积分规则

Archiver|手机版|小黑屋|DoDVip ( 桂ICP备14000730号 )

GMT+8, 2024-5-7 21:32 , Processed in 0.058186 second(s), 20 queries .

Powered by Discuz! X3.5

Copyright © 2001-2024 Tencent Cloud.

快速回复 返回顶部 返回列表